Creating Guru Cards from Slack
Great knowledge gets shared in Slack every day — and then it disappears into the message history. Guru's Slack app lets you capture that knowledge on the spot, turning any message or thread into a Guru Card without leaving Slack.
This is especially powerful for knowledge that surfaces organically: a clear explanation from a subject matter expert, a process that gets re-explained repeatedly, or a decision that your team needs to remember. Once it's a Card, it's searchable, verifiable, and available to your whole team - including as a source for Knowledge Agent answers in Slack.
Access RequiredOnly users with a Collection Owner role or a relevant custom role can create or edit Cards. Users without this access won't see the Create Card or Add to existing Card options in Slack message shortcuts.
Before you start
The Guru app must be added to the Slack channel before you can create Cards from messages in it. If Guru isn't in the channel yet, type /invite @guru or go to Channel settings > Integrations > Add apps and select Guru.
Creating a new Card from a Slack message
- Click the three dots (⋯) on any Slack message you want to capture.
- Select More message shortcuts… and search for Create Card.
- Click Create Card.
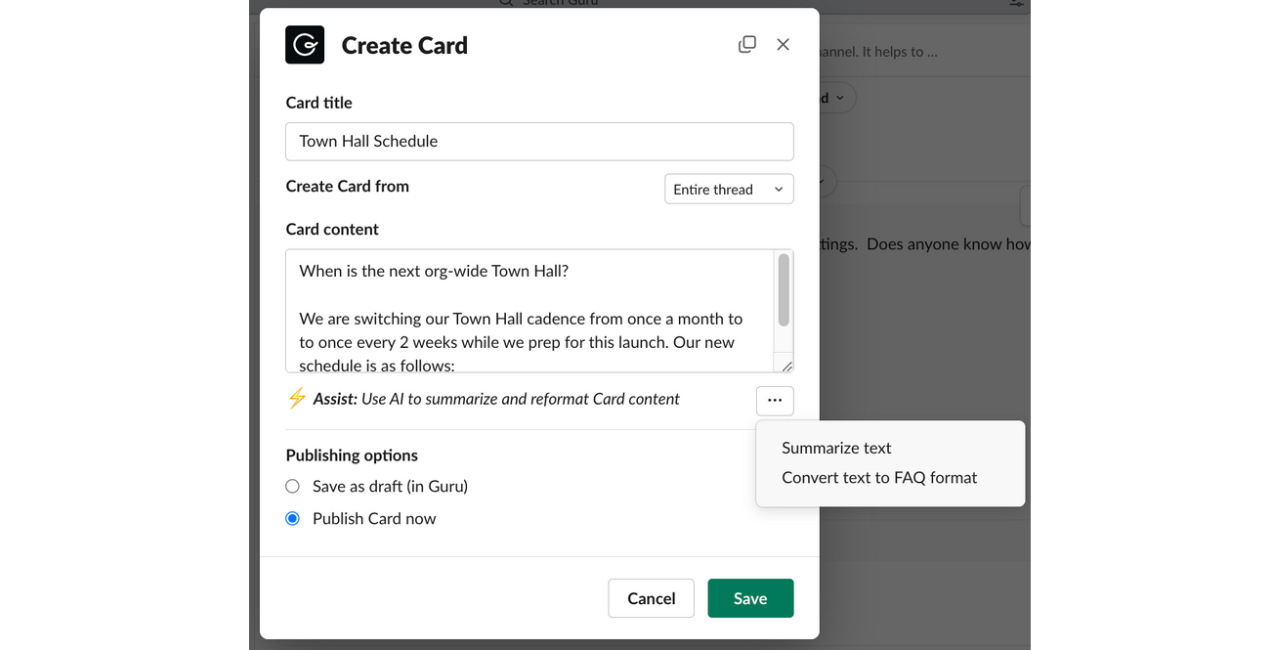
- Enter a Card title.
- Use the Create Card from dropdown to choose whether to pull in:
- The selected message only, or
- The full thread above the message.
- Review and edit the content pulled into the Card body.
**TipClick the ⋯ next to the Assist button to use AI to clean up the content before publishing:
- Summarize text — condenses longer conversations into a concise summary.
- Convert to FAQ format — restructures the content as a question-and-answer pair, useful for knowledge that tends to come up repeatedly.
- Under Publishing options, select:
- Save as draft — saves to Guru for you to finish and publish later in the web app or browser extension.
- Publish now — publishes the Card immediately.
- If publishing now, choose the Collection where the Card should be saved, then click Next.
ImportantIf you click Cancel after selecting a Collection, the draft will not be saved. Make sure you're ready to proceed before clicking Next.
- Select a Verifier and set a Verification interval (defaults to the Card creator and every 3 months, respectively).
- Optionally, assign the Card to a folder or create a new one, and add or create tags.
- Click Save to publish.
The Guru app will post a threaded reply with links to View Card and Open Card in Guru.
NoteImages and files attached to Slack messages can't be pulled into Cards automatically. You'll need to add those manually after the Card is created in the Guru web app.
Adding to an existing Card from Slack
If a Slack message contains information that belongs in a Card that already exists, you can append it directly without creating something new.
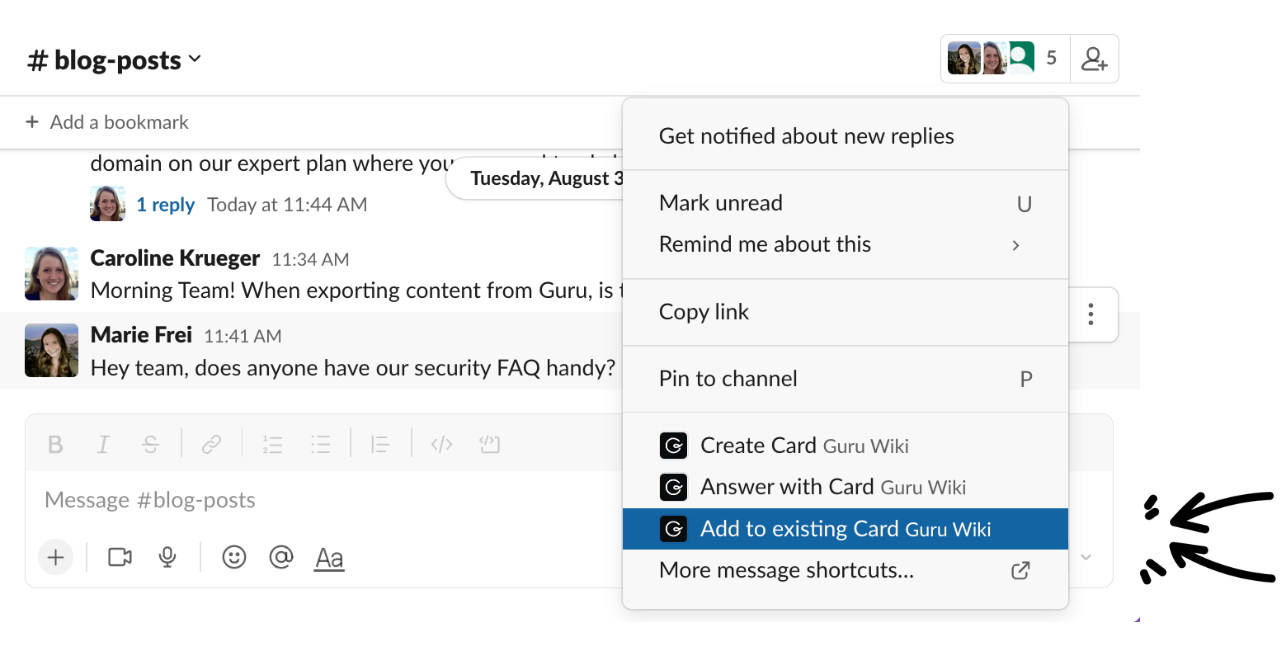
- Click the three dots (⋯) on the Slack message you want to add.
- Select More message shortcuts… and search for Add to existing Card.
- Search for and select the Card you want to update.
- Review the text in the editor — this content will be appended to the bottom of the selected Card.
- Under Publishing options, select:
- Save as draft — saves your changes for review before publishing.
- Publish now — updates the Card immediately.
- Click Save.
-
Frequently asked questions
Can I create a Card from a private Slack channel?
Yes, as long as the Guru app has been invited to that channel and you have the necessary Guru permissions to create Cards.
What happens to the Card after I create it?
The Card is saved to the Collection you selected and is immediately available to anyone with access. If the Collection is connected to a Knowledge Agent, the Card can start contributing to AI-generated answers in Slack right away.
Can I edit the Card after creating it from Slack?
Yes. You can open the Card in the Guru web app or browser extension at any time to edit content, update the verifier, change the Collection, or make any other adjustments.
What if I saved a draft — where does it go?
Drafts are saved to your Guru account and accessible from the web app. Navigate to My Guru > Drafts to find and finish publishing them.
Want a closer look at some key Guru features and best practices?Check out our events page for demos, workshops, new release roundups, Getting Started bootcamp, guest panelists and more! For upcoming live events and a series of past recordings: Click here to register
Updated about 1 month ago