Creating Knowledge Agents
Knowledge Agents power both search results and natural chat conversations throughout Guru, providing contextual responses that feel like talking to a knowledgeable teammate. This guide will help you create, configure, and deploy Knowledge Agents tailored to your team's specific needs.
Access Required
- Admin role required to rename, rebrand, or change the sources of the default Knowledge Agent.
- Connected Sources or Guru Cards already set up.
- Admin role required to rename, rebrand, or change the sources of the default Knowledge Agent.
New to Knowledge Agents?Start with What are Knowledge Agents? to understand what they do and why they matter before diving into setup.
ImportantThis article references skills , a new Knowledge Agent capability rolling out summer 2026. Skills are only available when creating a new agent - you won't see the option on existing agents. If you don't see Skills in your Agent settings when creating a new agent, **contact our support team to get access. **
If you are not sure if your agent has skills enabled, navigate to the Manage menu of that agent, then check to see if you see "skills" on the left-hand menu.
Creating your first Knowledge Agent
Build the basics
- Select the Agents tab in the left navigation and click the +, or edit existing agents from this menu.
- Select Add Knowledge Agent
- Give it a name that clearly indicates its purpose (like "Support Agent" or "Sales Enablement")
- Upload an image to make it visually distinct
- Write a description that explains:
- What the agent helps with
- What types of questions it answers
- When users should choose this agent over others
Tip
Think of the description as your agent's "About Me" - users will read it when deciding which agent to use, so make it clear and specific.
Connect your sources
Choose which knowledge sources this agent will search:
Option 1: All Sources
The agent automatically includes every source in your workspace, including future sources you add later. This is the simplest approach for agents that need broad coverage.
Option 2: Specific Sources
- Select Next: Select Sources
- Choose only the relevant Collections, Sources, or uploaded files. To connect a private Slack channel, you must be a Slack Admin.
- Optionally add filters to focus on specific content. These filters differ based on the source type but include filtering by date (ie. last 90 days of cases), folder (ie. only in the Engineering folder), or custom object like tags.
Multiple filters combine with AND logic. Filter options respect user permissions - users won't see content they don't have access to.
Option 3: Web Search
Add web search to let your agent search the entire web or specific trusted domains. Note that agents with web search enabled cannot use web searches for training in the AI Agent Center.
- In your Knowledge Agent, go to Connected Sources
- Toggle on Web Search
- Choose your scope:
- Search the entire web for maximum coverage
- Search specific domains by selecting Add Domain and entering just the domain (e.g.,
community.getguru.com) - no paths or parameters
Tip
Domain restrictions work great for industry-specific resources, official documentation sites, or your company's public knowledge bases.
Learn more about connecting and managing sources →
Filtering sources
When connecting a Collection or Source to your Knowledge Agent, you can add filters to control exactly which content is searched. Filters can be set during setup or updated anytime from the Knowledge Agent configuration page.Filter options respect your permissions - you'll only see folders or attribute values you have access to.
Date filters. Limit content by when it was created or last updated. You can filter using a relative window (e.g., last 30 days) or an absolute date range (before, after, or between specific dates). Both Created Date and Modified Date are supported. If your source doesn't provide native dates, Guru falls back to its own internal timestamps.
Collection folder filters. Scope a connected Collection to specific folders instead of the whole thing. Select one or more folders — content from any selected folder is included (OR logic). When selecting a parent folder, you can choose whether to include all nested folders or only the Cards directly in that folder.
Source attribute filters. Filter external sources like Salesforce, Jira, or Google Drive by record type and field values. You can select one or more record types to include, then apply attribute-level filters — for example, filtering to Jira issues where Status = "Open" AND Project = "Onboarding." Multiple values within a single attribute use OR logic; multiple attributes combine with AND logic.
Combining filters. All filter types work together using AND logic — for example, you can filter a source to a specific record type, with a specific status, modified in the last 30 days.
Set who can use it
- Add Viewers—the users or Groups who can use this agent.
- Assign any relevant custom roles
- Assign a Knowledge Agent Owner (someone who can manage settings)
- Select Create Agent
Note
Users need access to BOTH the agent AND its connected sources to see results. Admins and owners don't automatically have source access - you still need to grant permissions.
If your Knowledge Agent uses Skills, you can also restrict individual skills to specific users or groups within the agent's existing audience. This lets you build one agent with layered capabilities — some skills open to everyone, others scoped to a subset. See Restricting skill access for details.
Configuring your Knowledge Agent
Once you've created your agent, configure its capabilities and behavior.
Set up automated verification
Keep your knowledge base current without manual review cycles. Knowledge Agents can automatically verify and unverify content based on usage patterns and feedback signals. Auto-Verify is on by default for all agents, while Auto-Unverify is off by default but can be enabled in the Quality tab.
Learn more about automated verification →
Customize how the agent responds
Control your agent's tone, format, and response style:
- Open your agent and go to the Behavior tab
- Customize the prompt to control how the agent answers questions
- Update the "no answer found" message using markdown to include helpful links, next steps, or who to contact
- Test your changes
- Select Save (or revert to default anytime)
Configure Skills
New Knowledge Agents come with default Answer and Research skills that you can customize or build on. Skills let you define specialized behaviors for different types of questions — so a single Knowledge Agent can handle quick answers, deep research, troubleshooting workflows, and more.
To configure Skills, open your Knowledge Agent and go to the Skills tab. Learn more here.
TipOnce your agent is live, Operator Mode is how you iterate on its skills and system prompt over time — describe changes in plain language and the agent drafts them with you.
Enable Research Mode
Research lets your Knowledge Agent perform deep, multi-source analysis that goes beyond single-question answers - combining internal knowledge with real-time web search for comprehensive, well-cited reports.
On Knowledge Agents with Skills: New Knowledge Agents include a pre-configured Research skill. The agent routes to it automatically when users ask research-style questions (e.g., "Research our competitor landscape" or "Analyze customer feedback from last quarter"). There's no toggle to flip - the Research skill is available by default and can be customized like any other skill. Learn more in Configuring Skills on Knowledge Agents.
On Knowledge Agents without Skills: Enable Research Mode in your Knowledge Agent's settings under the Behavior tab. Once enabled, users can toggle into Research mode in the chat interface.
Research is ideal for agents supporting strategic work, complex questions, or topics that benefit from pulling together information from multiple sources.
Learn more about Research Mode →
Deploying your Knowledge Agent
Once your agent is configured, deploy it where your team works.
In Slack channels
- Open your agent and go to the Slack tab
- Enable the agent in Slack
- Assign it to specific channels. Each channel can only have one Knowledge Agent, but the same agent can be in multiple channels.
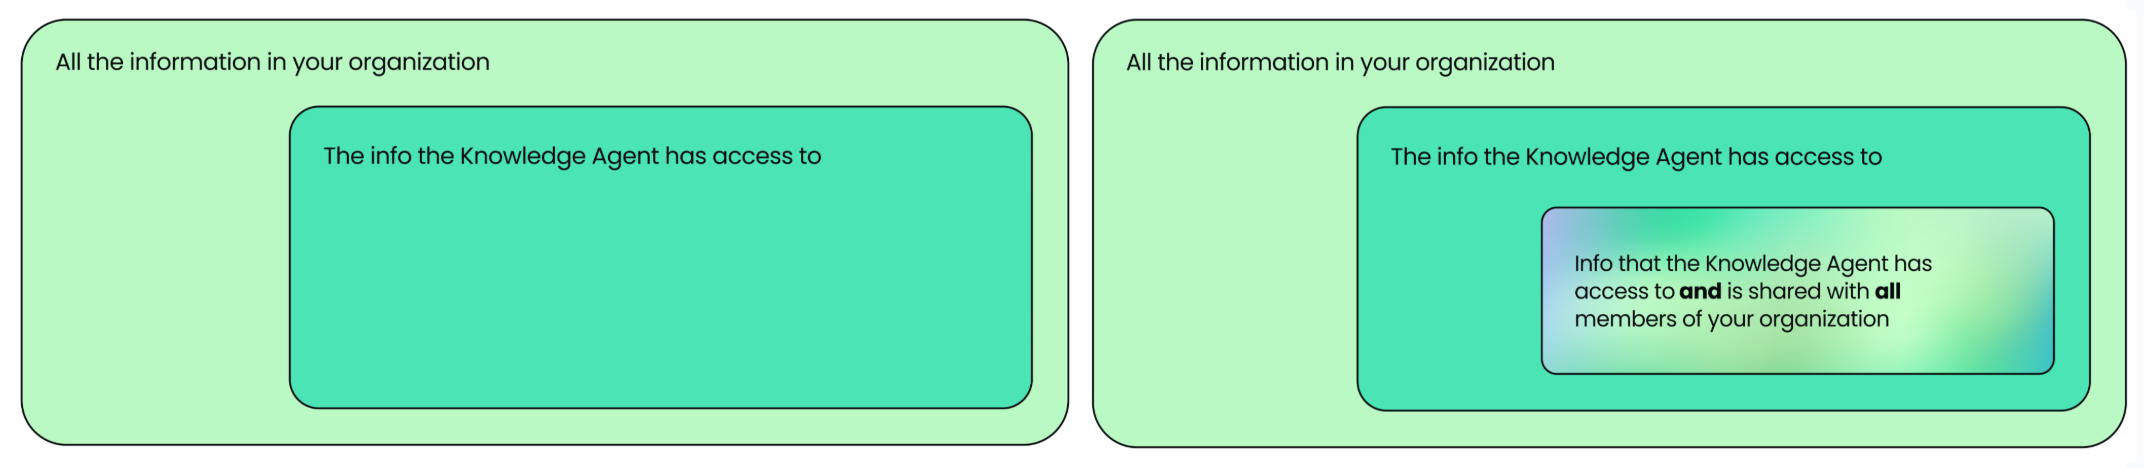
- Toggle Limit responses to sources shared with All Members if needed for sensitive content
Tip
Different answers in Slack vs. Guru? Check if "Limit responses to sources shared with All Members" is enabled in your agent's Slack settings.
When this toggle is enabled and a question is asked in Slack, only sources that have been explicitly shared with the "All Members" group will be used to generate the answer. Sources with inherited permissions are not included, since their access is controlled by the source application rather than the "All Members" group.
On Guru Pages
- Open the Page and select Edit
- Set your Knowledge Agent as the default
In the browser extension
- Open your agent settings
- Go to Website > Add a Website
- Enter the display name and URL
- Select Add Website
Now when users open the Guru Extension on that site, they'll see this agent by default.
Via API
- Open your Knowledge Agent
- Copy the search and answer endpoints
- Use them with Guru's API
Using MCP (Model Context Protocol)
Guru supports MCP integration in two directions:
Guru's MCP Server: Use Guru in external AI tools
Connect AI tools like Claude Desktop, Cursor, or ChatGPT to your Knowledge Agents—ideal for developers accessing docs in their IDE or content creators using AI writing tools.
External tools connect TO Guru. Learn more
Third-party MCP: Connect external tools to Guru
Connect tools like Asana, Slack, or Salesforce to your Knowledge Agents—ideal when agents need real-time external data or should take actions like creating tasks.
Guru connects TO external tools.
To configure:
- Admins: Add MCP servers at Manage > Settings > Third-Party MCP Servers
- Agent Owners: Configure at Manage > Knowledge Agents > [Your Agent] > MCP Connectors
- Users: Authenticate via OAuth when first using the agent
Managing your default Knowledge Agent
Every workspace includes a default Knowledge Agent that's available to all users. Admins can rename it, update its branding, and choose which sources it searches, and what Groups it has access to - so it fits your organization's needs from day one.
- Go to Manage > Knowledge Agents
- Select the default "Guru" agent
- Change the name, description, and image
- Adjust which sources it searches (all sources or specific sources)
- Select Save
Beyond customizing the default agent, admins can also restrict or remove it entirely:
- Remove group access. Remove "All Members" from the agent's permissions to limit it to specific user groups only.
- Hide from search. Toggle off the agent's visibility in the search bar so it no longer appears in the agent picker.
- Delete the agent. Permanently delete the default agent the same way you would any custom agent.
When a user's last-used agent (including the default agent) has been hidden or deleted, the search and chat bar shows a "No agent selected" state. From there, users can pick a different agent from the dropdown or continue with a plain search — they can still find Cards, they just won't receive AI-powered answers until they select an available agent.
Tip
Many teams customize their default agent to be a "General Knowledge" agent that searches commonly used sources, then create specialized agents for specific teams.
Pinning Knowledge Agents
Pinning gives users fast access to their most-used agents directly from the Home tab and the top of the Agents panel.
Admins — pin an agent for the whole team (Team Essentials)
- Go to Manage → Team Essentials.
- Click Add a resource and search for the agent you want to pin.
- Select the agent. It appears in the Team Essentials table.
- Drag rows to reorder them — the order here is the order users see.
Each pinned agent uses its own existing permissions. If a user doesn't have access to the agent, it won't appear for them.
Users — pin an agent for yourself (My Pins)
- Open the action menu next to any agent in the Agents panel.
- Select Pin.
The agent appears in your My Pins section on the Home tab and at the top of the Agents panel. To remove it, open the action menu again and select Unpin, or click the unpin icon in My Pins and confirm.
Frequently asked questions
Can Knowledge Agents remember our conversation?
Yes, in chat mode. The agent maintains context throughout a conversation and can reference what you discussed earlier.
Why should I write a good description?
When you have multiple agents, users see a list with names and descriptions. Clear descriptions help them pick the right agent for their question.
Can one user access multiple Knowledge Agents?
Yes. Users see all agents they have access to and can switch between them. They'll only see results from sources they're permissioned for.
What if someone has agent access but not source access?
They won't see results from sources they can't access. The agent automatically filters based on the user's permissions.
Do I need to create agents for every team?
Not necessarily. Start with your default agent and create specialized agents only when teams have distinct needs or when search results become too broad.
How does Guru's web search functionality work?
The web search feature operates using real-time federated queries rather than indexing or storing external content. When a Knowledge Agent uses web search, the system reaches out to publicly available web pages at the moment of the request and returns results dynamically.
I'm getting an error that says "You are not a Slack user in this workspace" when I try to assign a Knowledge Agent to Slack. What does this mean?
This error indicates that Guru could not associate your Guru user with a Slack user, which is required to connect a Knowledge Agent to Slack. Double check that the email that you use to sign into Guru matches the email you use to sign into Slack. If they do not, follow these instructions to link your Slack and Guru users.
Want a closer look at some key Guru features and best practices?Check out our events page for demos, workshops, new release roundups, Getting Started bootcamp, guest panelists and more! For upcoming live events and a series of past recordings: Click here to register
Updated 6 days ago